
一、需求背景
给定一个xlsx表格,第一列是企业的全称,要求补全企业的统一社会信用代码作为第二列,爬取页面的url作为第三列。
二、需求分析
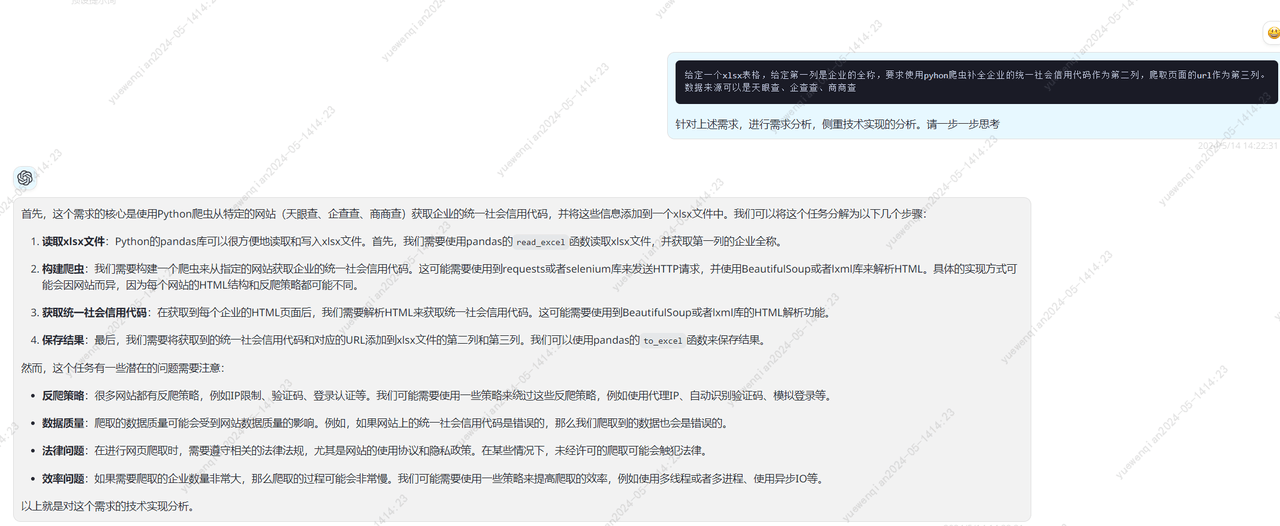
基于gpt4给出的分析,实现思路有了
还需要确切知道安装什么库
根据gpt4提供的库,我挨个进行了简单了解,我需要知道每种库能提供的能力。至于每种库的使用,不用特意去学习,大模型会出手,仅仅知道每种库能干什么足够了
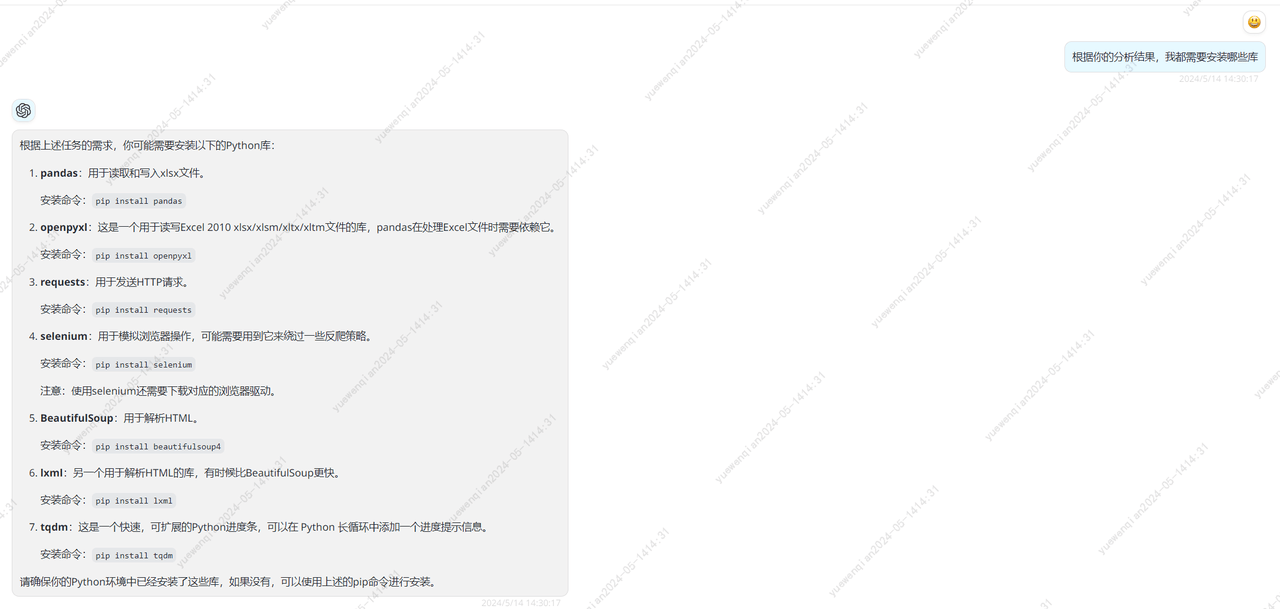
最终,我确定了使用以下5种库足矣。
1.selenium:模拟用户在浏览器中的操作。
2.BeautifulSoup:解析html文件
3.requests:进行网络请求。
4.pandas:处理xlxs表格。
5.openpyxl:pandas依赖库
使用selenium还需要安装浏览器驱动。
三、代码实现
首先选择一个网站作为数据来源。
先尝试的是商商查,首先对网站进行分析。
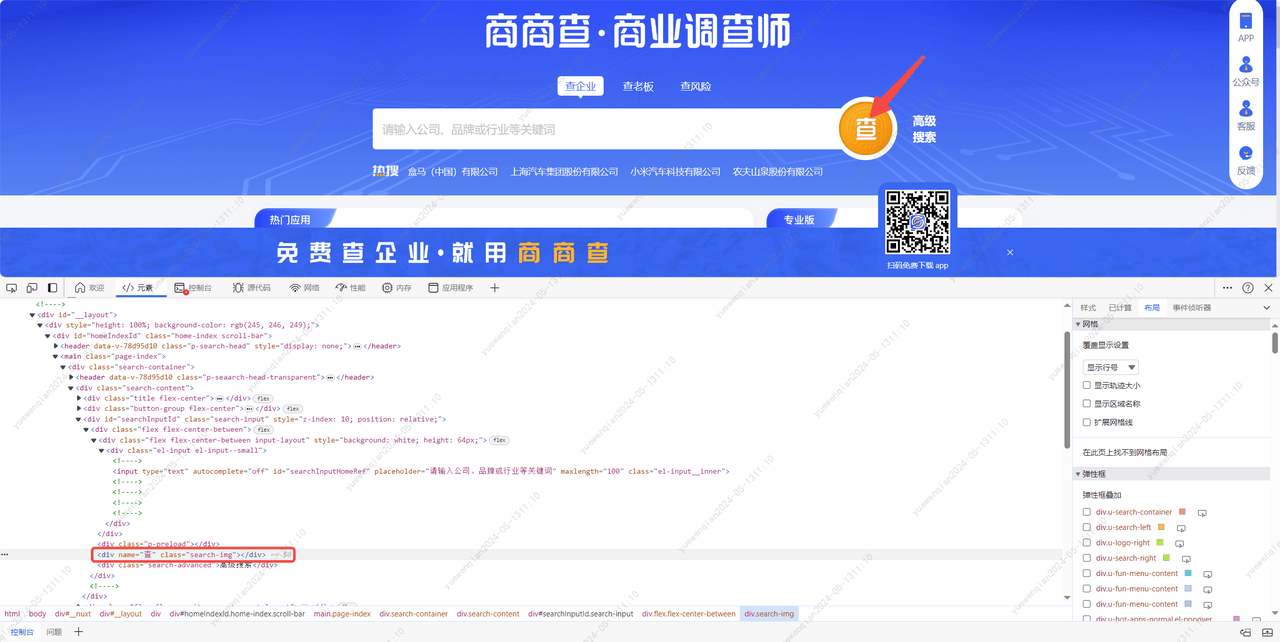
在输入框中输入'腾讯云'后,点击查询按钮,进入到搜索结果页。
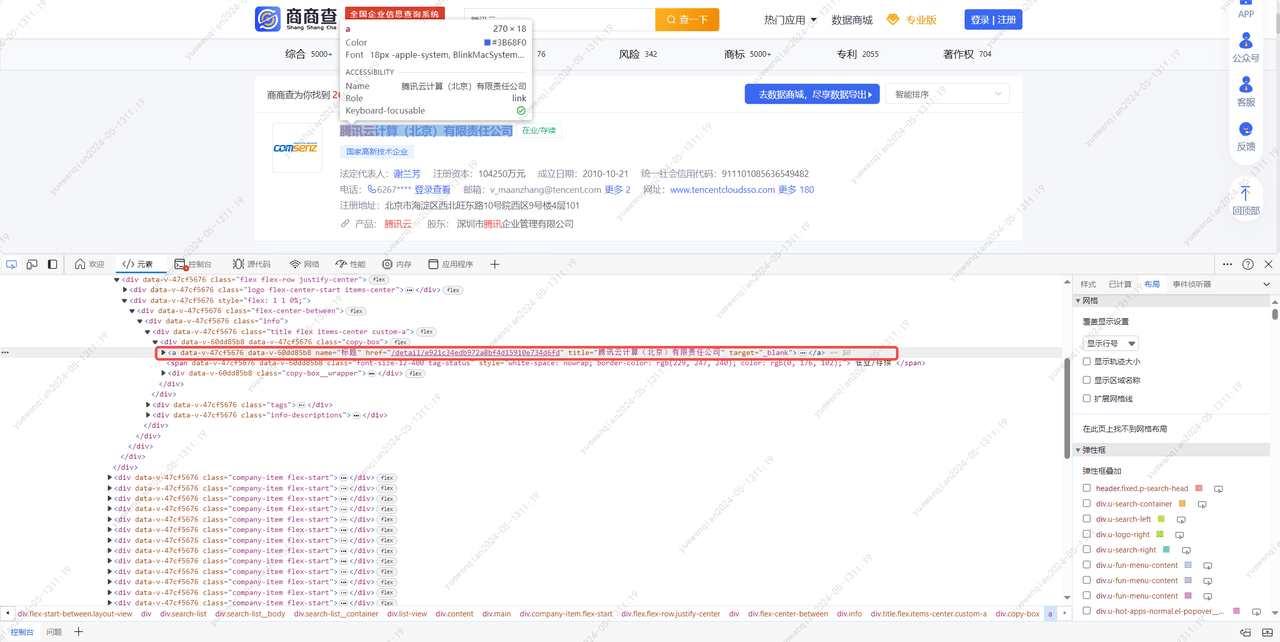
对页面结构进行分析后,可以梳理出以下步骤:
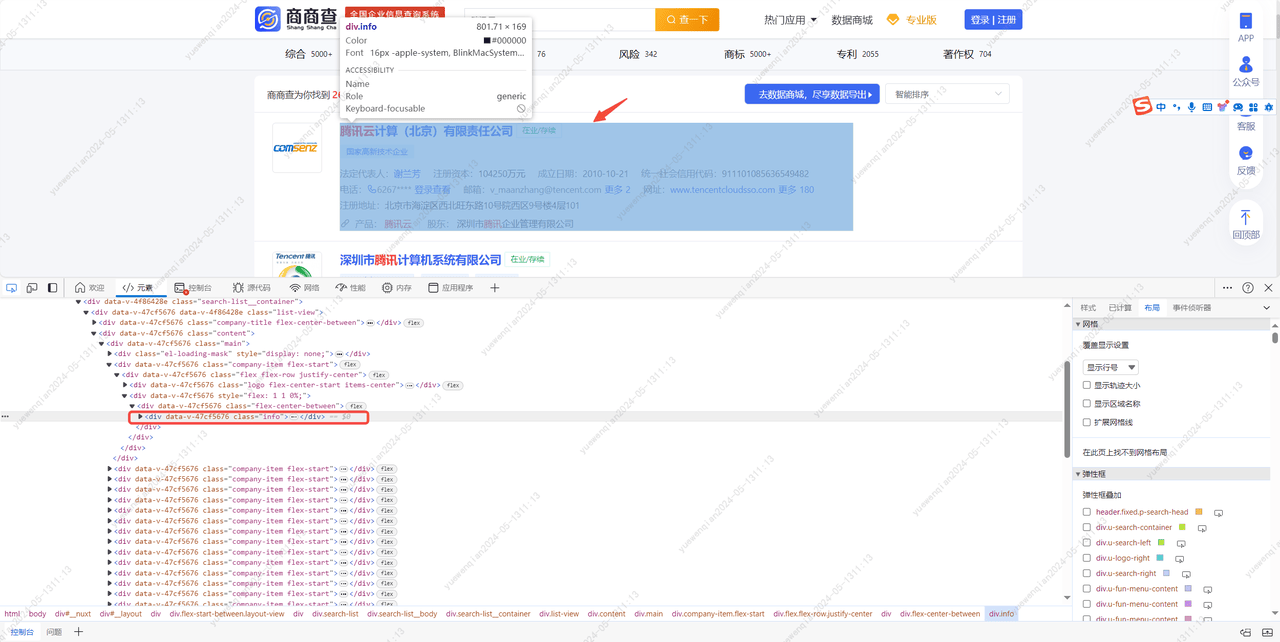
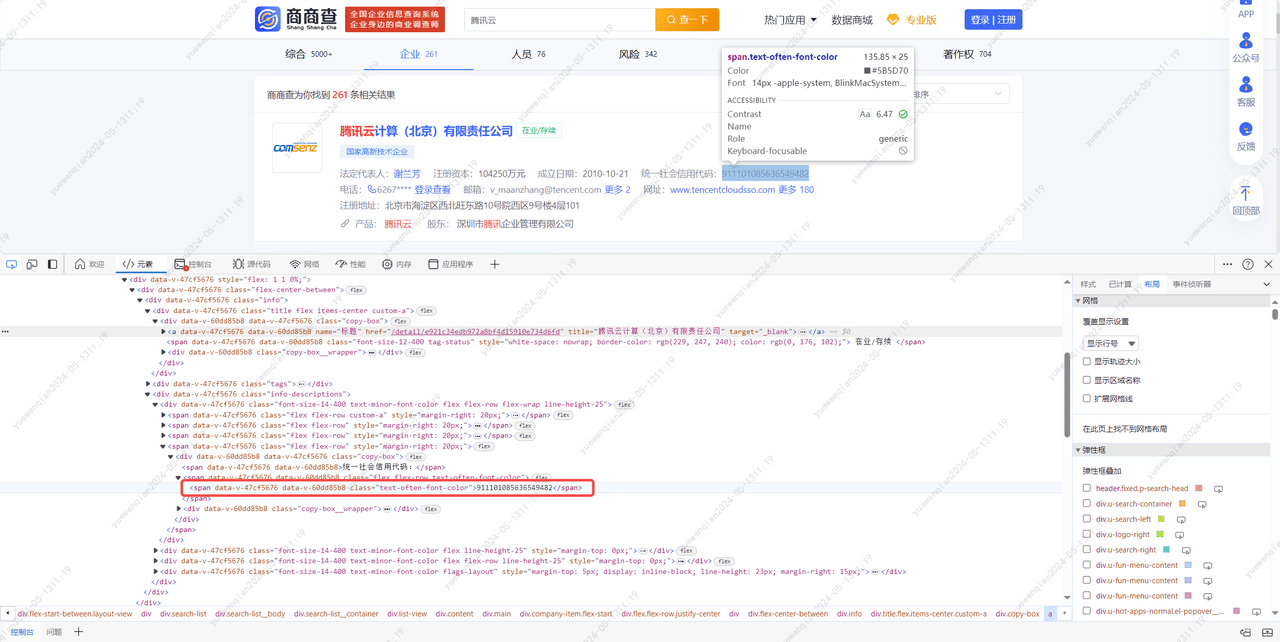
进入到这个```https://www.sscha.com/```网站后,在id值为'searchInputHomeRef'的input标签中输入要查询的关键字,然后点击class值为'search-img'的div标签进行查询,在进入搜索结果页后,等待页面加载完成,即class值为'info'的div标签不为空,接着创建该html的beautifulsoup对象。然后获取这个div下class值为'title'的div标签下的a标签,打印a标签的title。然后获取class值为'info-descriptions'的div标签,接着获取这个div下class为'text-often-font-color'的span标签,获取第二个span,打印这个span的值。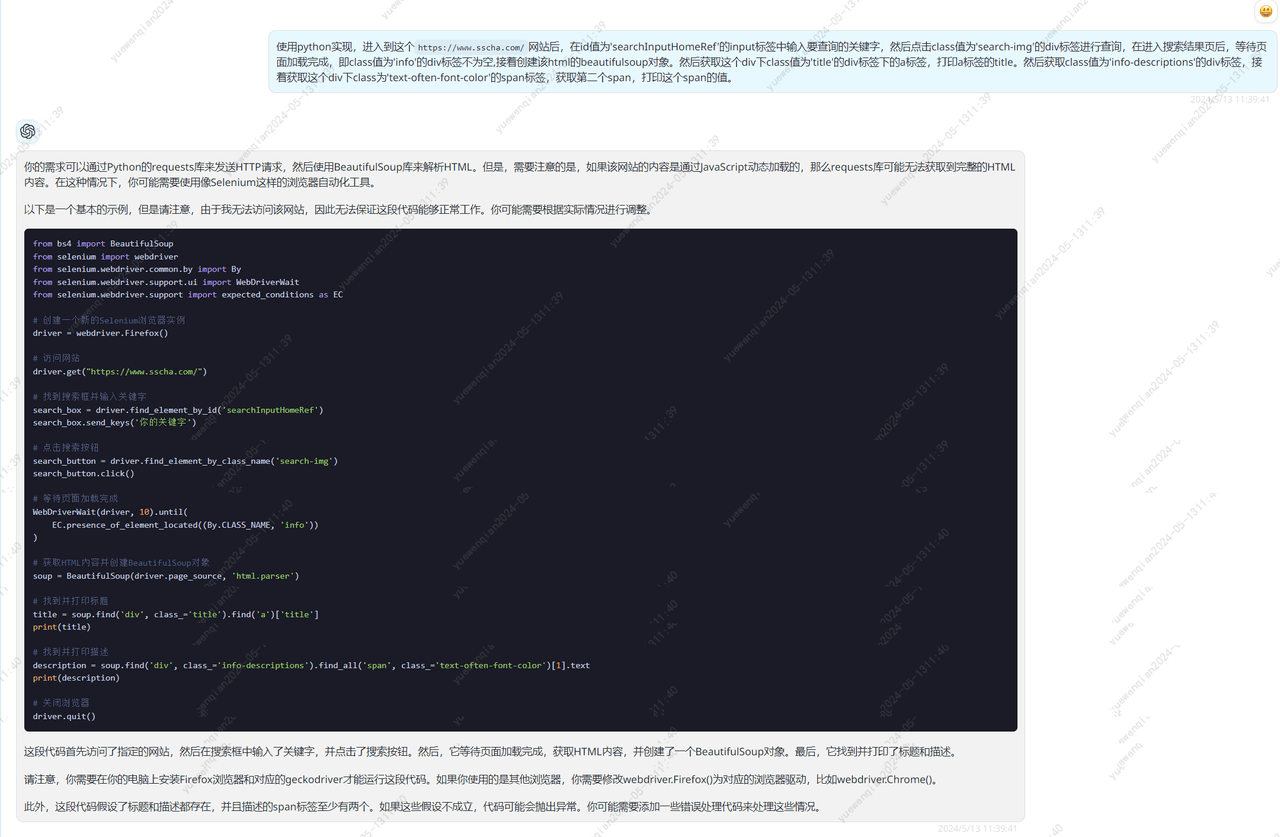
from bs4 import BeautifulSoup
from selenium import webdriver
from selenium.webdriver.common.by import By
from selenium.webdriver.support.ui import WebDriverWait
from selenium.webdriver.support import expected_conditions as EC
# 创建一个新的Selenium浏览器实例
driver = webdriver.Firefox()
# 访问网站
driver.get("https://www.sscha.com/")
# 找到搜索框并输入关键字
search_box = driver.find_element_by_id('searchInputHomeRef')
search_box.send_keys('你的关键字')
# 点击搜索按钮
search_button = driver.find_element_by_class_name('search-img')
search_button.click()
# 等待页面加载完成
WebDriverWait(driver, 10).until(
EC.presence_of_element_located((By.CLASS_NAME, 'info'))
)
# 获取HTML内容并创建BeautifulSoup对象
soup = BeautifulSoup(driver.page_source, 'html.parser')
# 找到并打印标题
title = soup.find('div', class_='title').find('a')['title']
print(title)
# 找到并打印描述
description = soup.find('div', class_='info-descriptions').find_all('span', class_='text-often-font-color')[1].text
print(description)
# 关闭浏览器
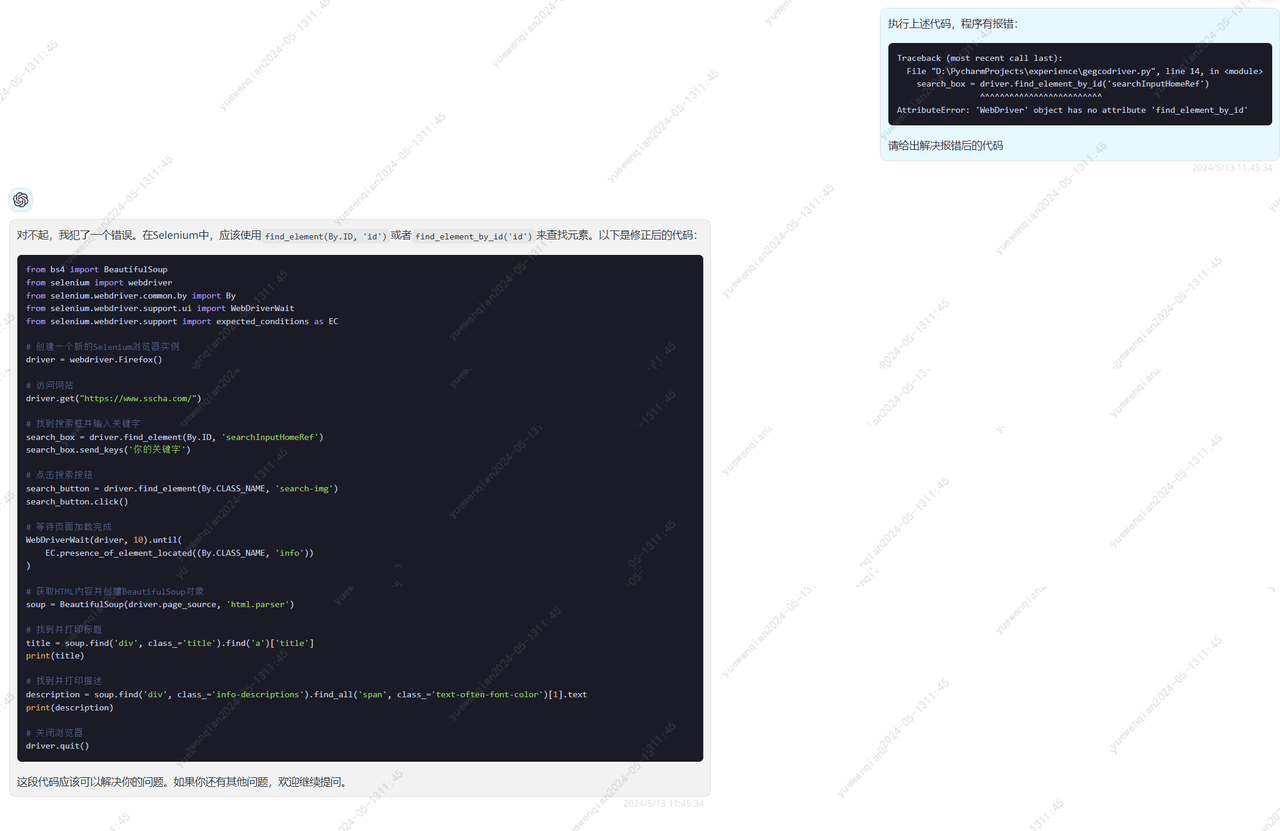
driver.quit()执行上述代码,发现有报错:
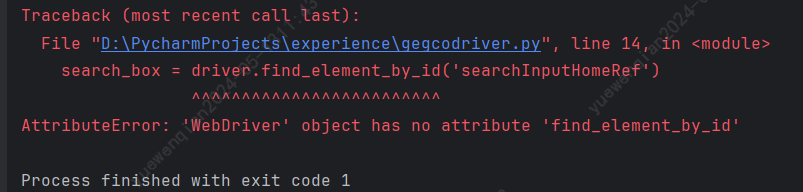
尝试让gpt4进行修正
from bs4 import BeautifulSoup
from selenium import webdriver
from selenium.webdriver.common.by import By
from selenium.webdriver.support.ui import WebDriverWait
from selenium.webdriver.support import expected_conditions as EC

# 创建一个新的Selenium浏览器实例
driver = webdriver.Firefox()

# 访问网站
driver.get("https://www.sscha.com/")

# 找到搜索框并输入关键字
search_box = driver.find_element(By.ID, 'searchInputHomeRef')
search_box.send_keys('你的关键字')

# 点击搜索按钮
search_button = driver.find_element(By.CLASS_NAME, 'search-img')
search_button.click()

# 等待页面加载完成
WebDriverWait(driver, 10).until(
    EC.presence_of_element_located((By.CLASS_NAME, 'info'))
)

# 获取HTML内容并创建BeautifulSoup对象
soup = BeautifulSoup(driver.page_source, 'html.parser')

# 找到并打印标题
title = soup.find('div', class_='title').find('a')['title']
print(title)

# 找到并打印描述
description = soup.find('div', class_='info-descriptions').find_all('span', class_='text-often-font-color')[1].text
print(description)

# 关闭浏览器
driver.quit()
将修正后的代码,部分参数进行修改后执行,发现出现了以下提示。
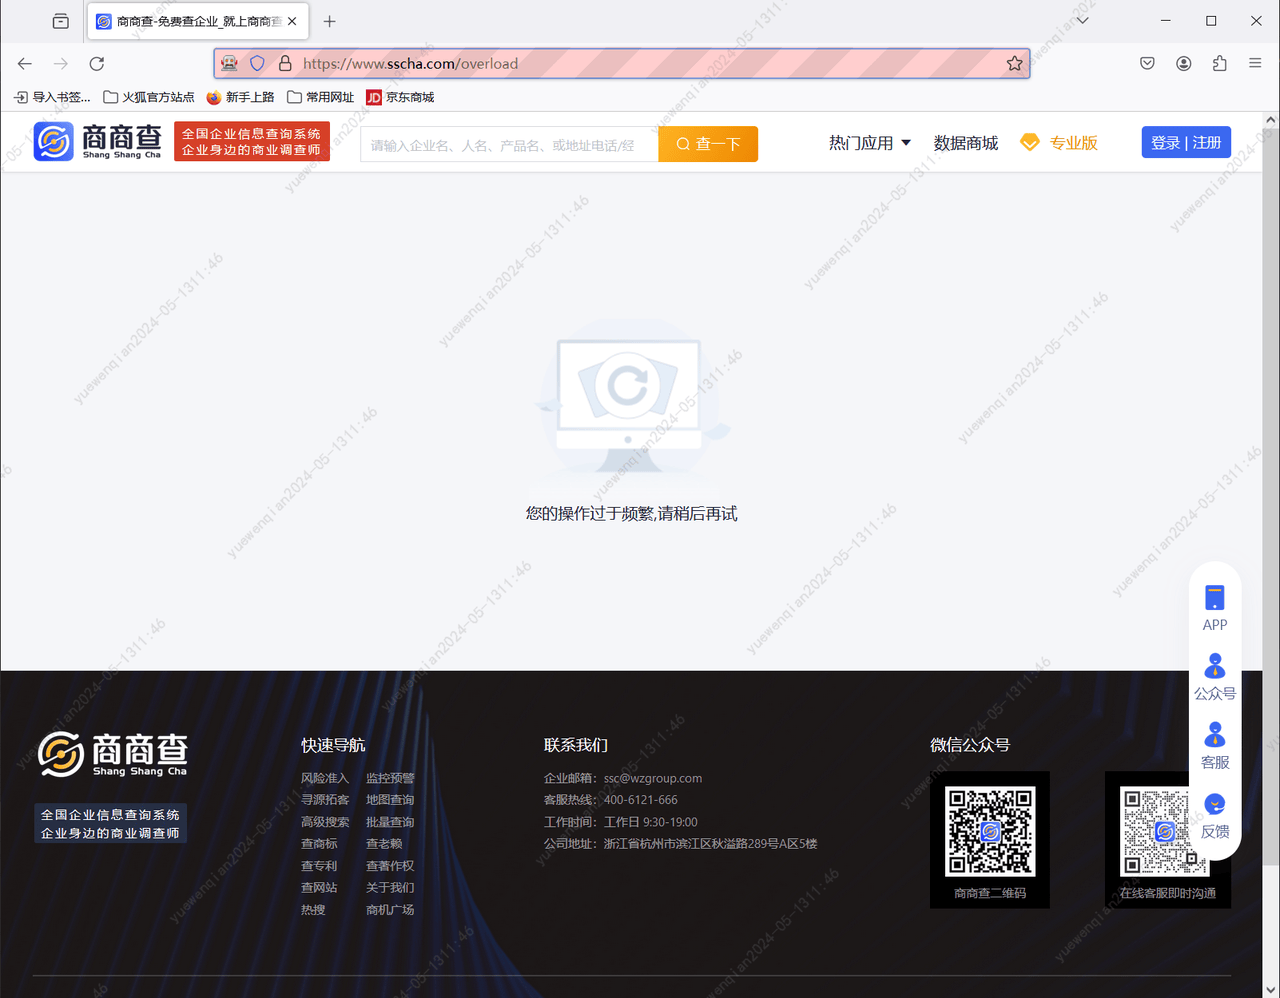
这个提示给的就很奇怪,我明明才操作了两次,却出现了这个提示。我又手动进行了查询,发现是能够进行正常访问的。
猜测可能是对驱动进行了检测,于是我又在驱动打开的浏览器页面进行了查询,果然又提示了频繁。
尝试询问gpt4,看看有没有办法能够绕过检测。
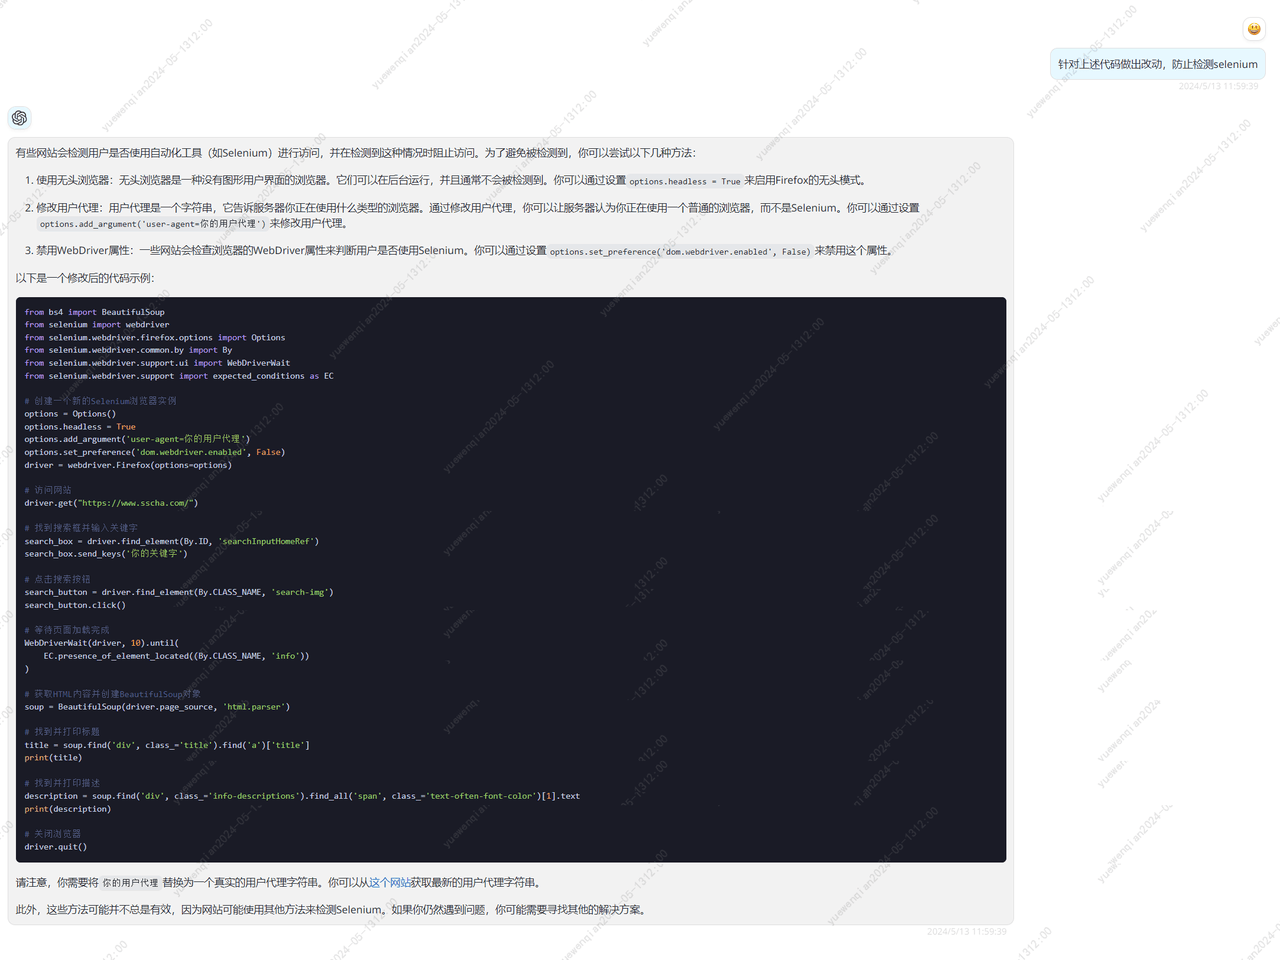
from bs4 import BeautifulSoup
from selenium import webdriver
from selenium.webdriver.firefox.options import Options
from selenium.webdriver.common.by import By
from selenium.webdriver.support.ui import WebDriverWait
from selenium.webdriver.support import expected_conditions as EC

# 创建一个新的Selenium浏览器实例
options = Options()
options.headless = True
options.add_argument('user-agent=你的用户代理')
options.set_preference('dom.webdriver.enabled', False)
driver = webdriver.Firefox(options=options)

# 访问网站
driver.get("https://www.sscha.com/")

# 找到搜索框并输入关键字
search_box = driver.find_element(By.ID, 'searchInputHomeRef')
search_box.send_keys('你的关键字')

# 点击搜索按钮
search_button = driver.find_element(By.CLASS_NAME, 'search-img')
search_button.click()

# 等待页面加载完成
WebDriverWait(driver, 10).until(
    EC.presence_of_element_located((By.CLASS_NAME, 'info'))
)

# 获取HTML内容并创建BeautifulSoup对象
soup = BeautifulSoup(driver.page_source, 'html.parser')

# 找到并打印标题
title = soup.find('div', class_='title').find('a')['title']
print(title)

# 找到并打印描述
description = soup.find('div', class_='info-descriptions').find_all('span', class_='text-often-font-color')[1].text
print(description)

# 关闭浏览器
driver.quit()
修改上述部分代码后,再次进行请求,还是会提示频繁。显然还有其他的检测项。
不浪费时间,既然这条路不通,那就换条路尝试,访问企企查,对其网页进行分析。

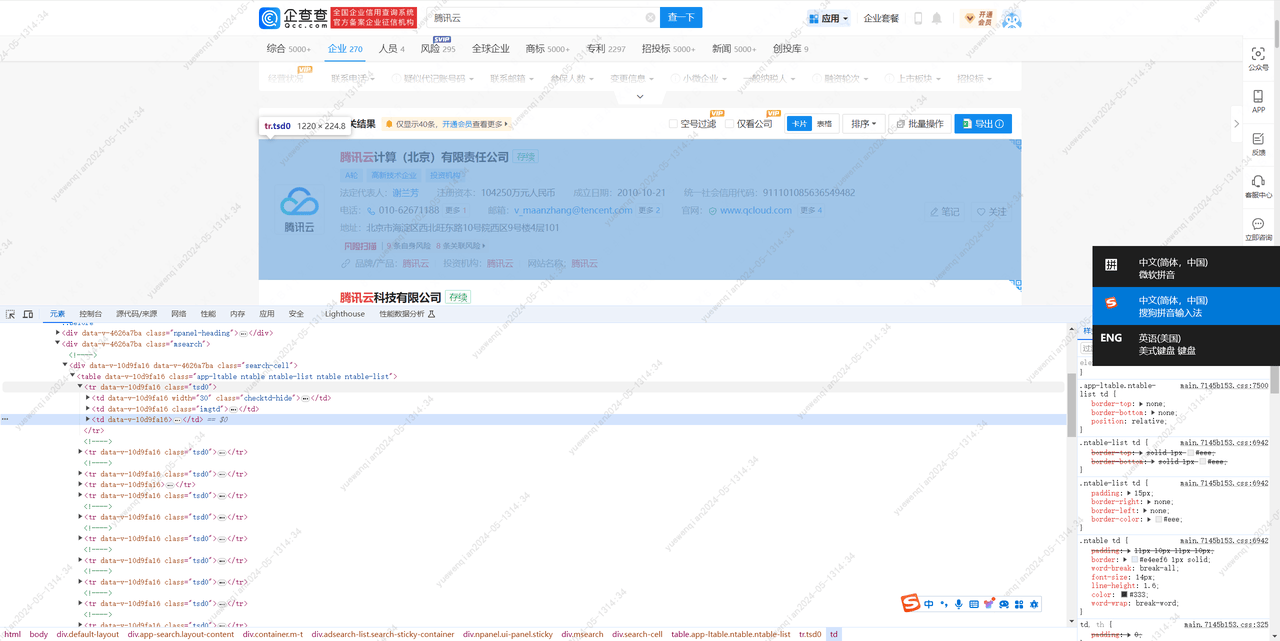
分析完毕,这回我们先尝试是否能正常进入到结果页:
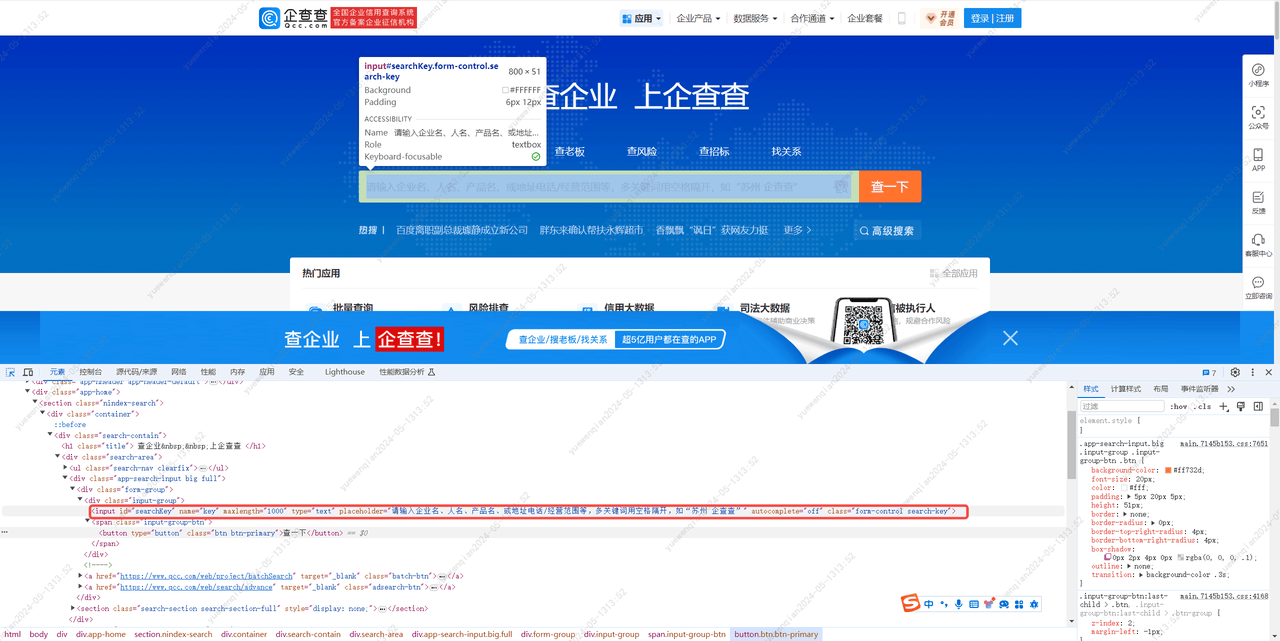
进入到 https://www.qcc.com/ 这个网站后,在一个id为'searchKey'的input标签输入'腾讯云',然后点击class为’btn btn-primary‘的button标签进行查询,进入页面,等到页面渲染完成后,即当前页面tr标签不为空,将该html创建为一个BeautifulSoup对象
修改描述重复问几次防检测的代码,将所有的防检测方式都加上,增加成功率。
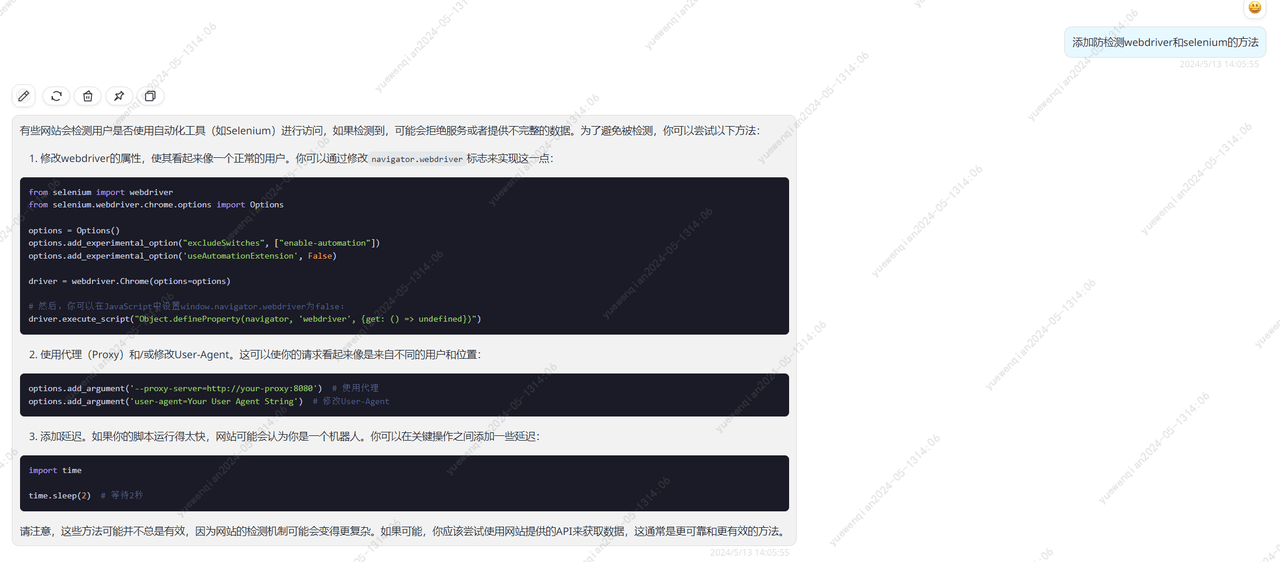
汇总上述所有的方式,并对其中参数做出适当修改,获得最终代码:
from selenium import webdriver
from selenium.webdriver.chrome.options import Options
from selenium.webdriver.common.by import By
from selenium.webdriver.support.ui import WebDriverWait
from selenium.webdriver.support import expected_conditions as EC
from bs4 import BeautifulSoup
import time

# 创建一个新的Chrome浏览器选项
options = Options()

# 禁用自动化扩展
options.add_experimental_option('excludeSwitches', ['enable-automation'])
options.add_experimental_option('useAutomationExtension', False)
# 使用随机的User-Agent
options.add_argument('user-agent=Mozilla/5.0 (Windows NT 10.0; Win64; x64) AppleWebKit/537.36 (KHTML, like Gecko) Chrome/58.0.3029.110 Safari/537.3')

# 创建一个新的Chrome浏览器实例
driver = webdriver.Chrome(options=options)  # 替换为你的chromedriver的实际路径
# 修改webdriver的属性
driver.execute_script("Object.defineProperty(navigator, 'webdriver', {get: () => undefined})")

# 让浏览器打开一个网页
driver.get('https://www.qcc.com/')
time.sleep(10)

# 找到搜索框并输入关键词
keyword = '腾讯云'
search_box = driver.find_element(By.ID, 'searchKey')
search_box.send_keys(keyword)

# 找到搜索按钮并点击
search_button = driver.find_element(By.CLASS_NAME, 'btn-primary')
search_button.click()

# 等待页面加载完成,即等待tr标签出现
WebDriverWait(driver, 60).until(EC.presence_of_element_located((By.TAG_NAME, 'tr')))

# 等待一段时间以确保页面完全加载
time.sleep(5)

# 获取页面的HTML内容
html = driver.page_source

# 创建BeautifulSoup对象
soup = BeautifulSoup(html, 'html.parser')


# 找到class为'maininfo'的div标签
maininfo_div = soup.select_one('.maininfo')
# 在maininfo_div中找到class为'copy-title'的span标签
copy_title_span = maininfo_div.select_one('.copy-title')
# 在copy_title_span中找到em标签
em_tag = copy_title_span.select_one('em')
# 获取em标签的值
em_value = em_tag.text
# 打印出em标签的值
print(em_value)

# 关闭浏览器
driver.quit()
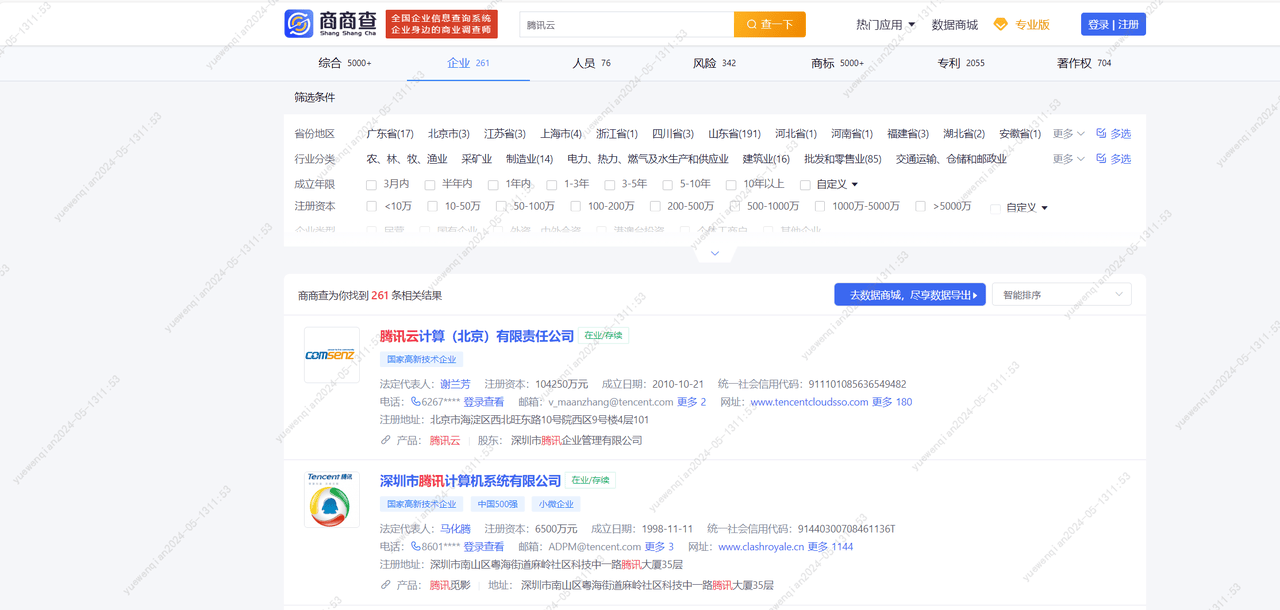
成功进入搜索结果页面,并打印了其中的标签
最容易失败的部分搞定了,那么接下来的事情就容易多了。
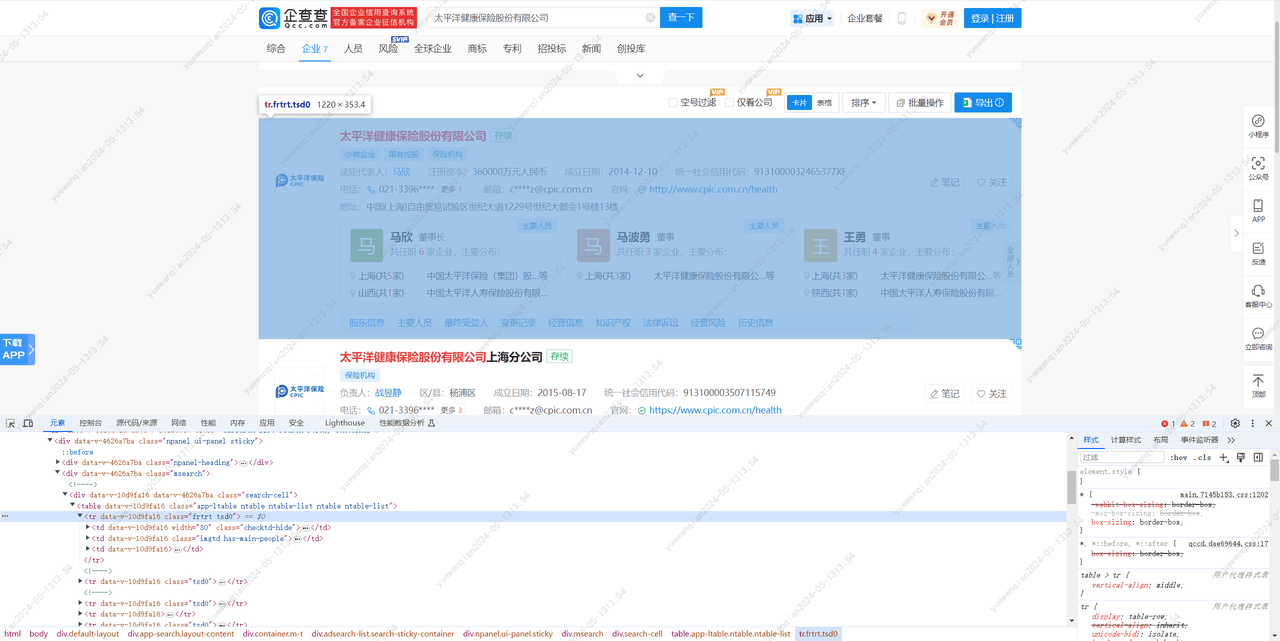
分析搜索结果页的html结构,获取企业名称和统一社会信用代码。
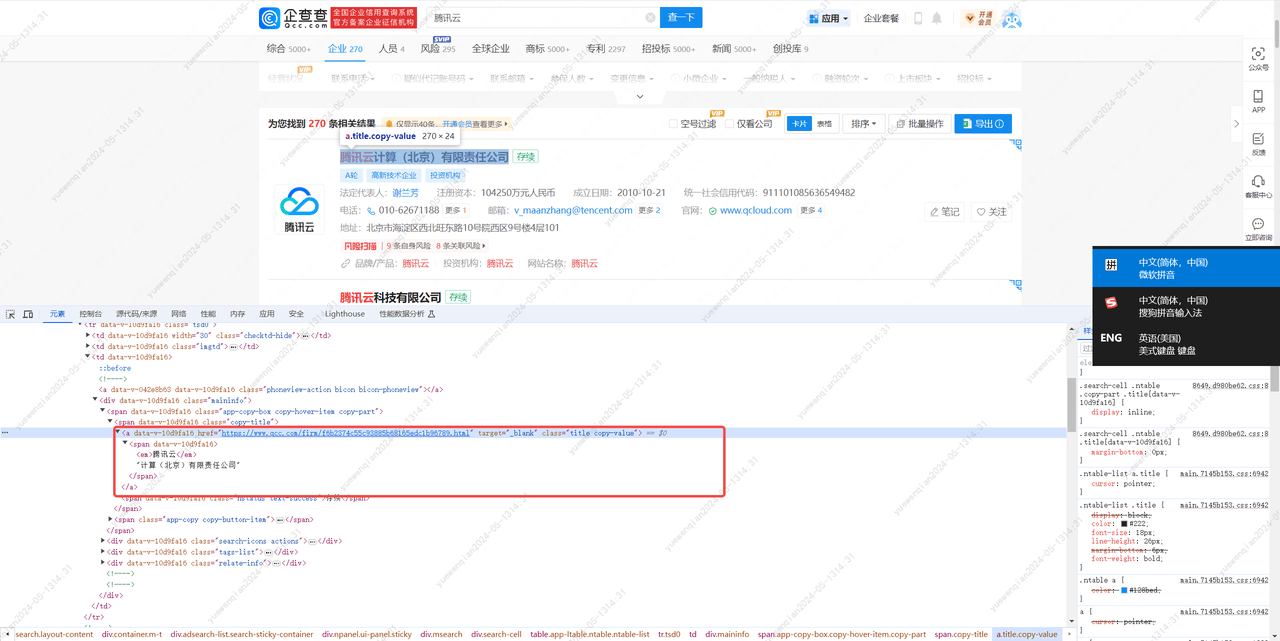
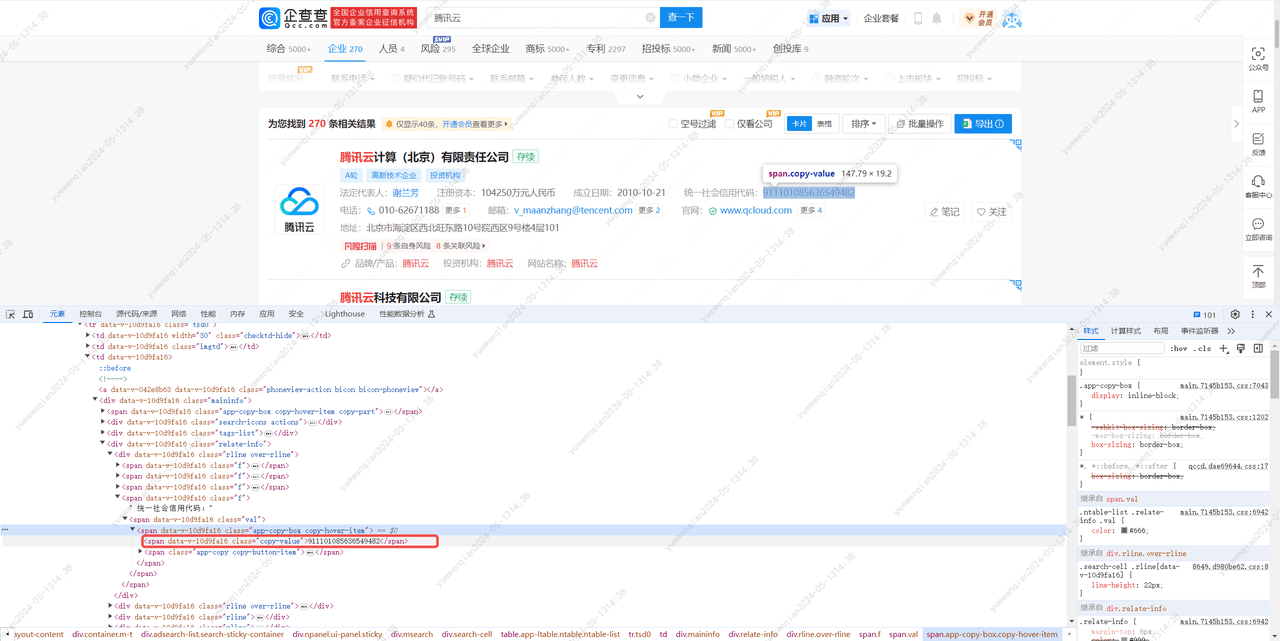
梳理思路总结为:
通过soup对象获取第1个class值为'tsd0'的tr标签,接着获取tr标签下的第3个td标签,接着获取td标签下class值为'title'的a标签,
获取a标签下span标签,获取span标签中的值,并去掉其中的em标签,得到的值作为'企业名称'。接着获取td标签下class值为'relate-info'的div标签,然后获取div标签下第1个class值为'rline'的div标签,获取div标签下class值为'copy-value'的span标签,获取span标签中的值,得到的值作为'统一社会信用代码'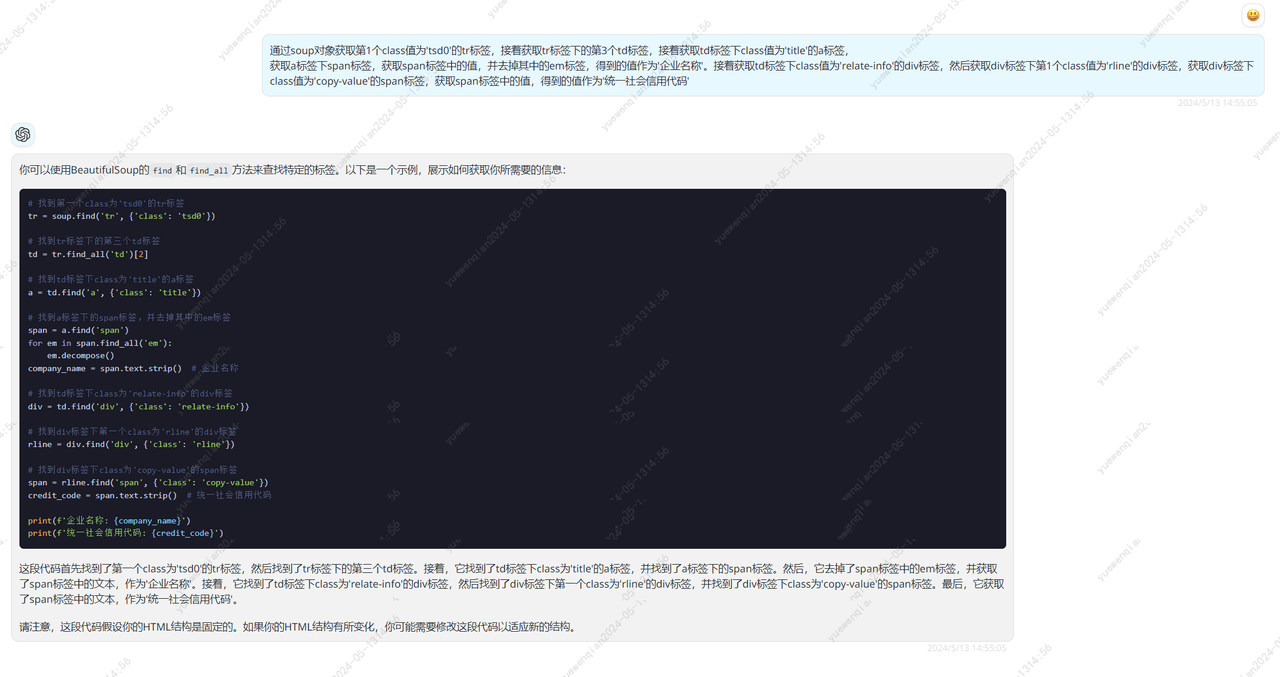
# 找到第一个class为'tsd0'的tr标签
tr = soup.find('tr', {'class': 'tsd0'})

# 找到tr标签下的第三个td标签
td = tr.find_all('td')[2]

# 找到td标签下class为'title'的a标签
a = td.find('a', {'class': 'title'})

# 找到a标签下的span标签,并去掉其中的em标签
span = a.find('span')
for em in span.find_all('em'):
    em.decompose()
company_name = span.text.strip()  # 企业名称

# 找到td标签下class为'relate-info'的div标签
div = td.find('div', {'class': 'relate-info'})

# 找到div标签下第一个class为'rline'的div标签
rline = div.find('div', {'class': 'rline'})

# 找到div标签下class为'copy-value'的span标签
span = rline.find('span', {'class': 'copy-value'})
credit_code = span.text.strip()  # 统一社会信用代码

print(f'企业名称: {company_name}')
print(f'统一社会信用代码: {credit_code}')
保险起见以及方便调试,我将搜索结果页的html下载下来存为test.html文件,调试期间,仅对test.html文件进行解析,简单修改代码后,执行结果如下:

解析部分完成了,下面就是xlsx的读取和写入了,创建一个名为companys.xlsx的文件,格式如下:

询问gpt4获取xlsx读取和写入的代码
使用python读取名为'companys.xlsx'的文件,第一列为'企业名称',第二列为'统一社会信用代码',第三列为‘数据来源’。遍历第一列的数据,将爬取到的统一社会信用代码赋值到第二列,并将页面的url赋值给第三列。最后,另存为'companys_result.xlsx'文件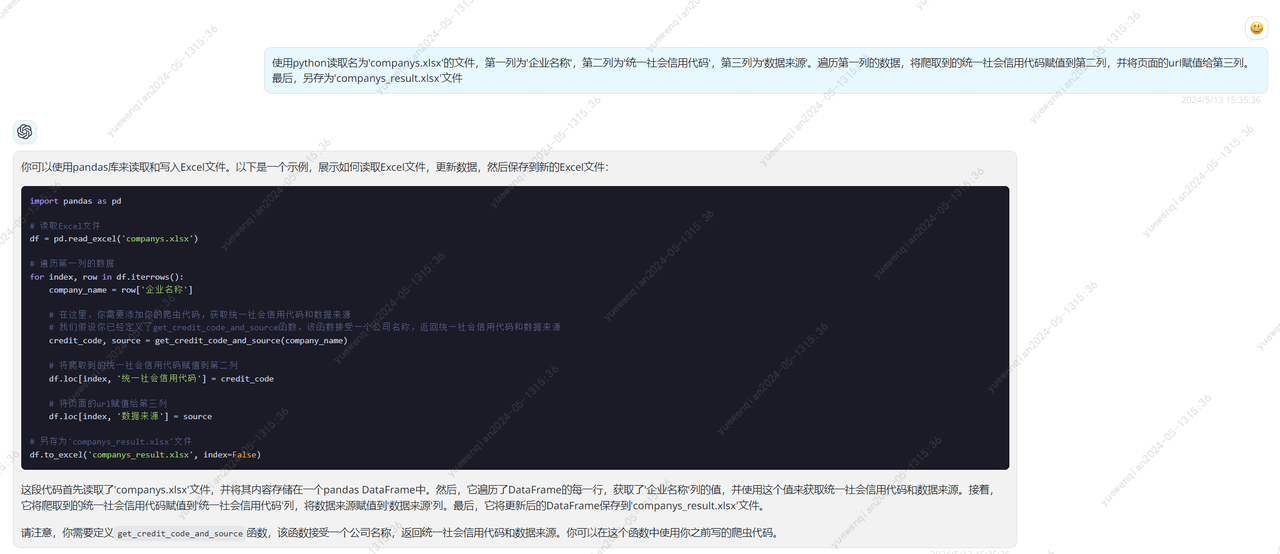
简单修改后,尝试对这段代码进行调试,发现报错了:

尝试让gpt4进行修复
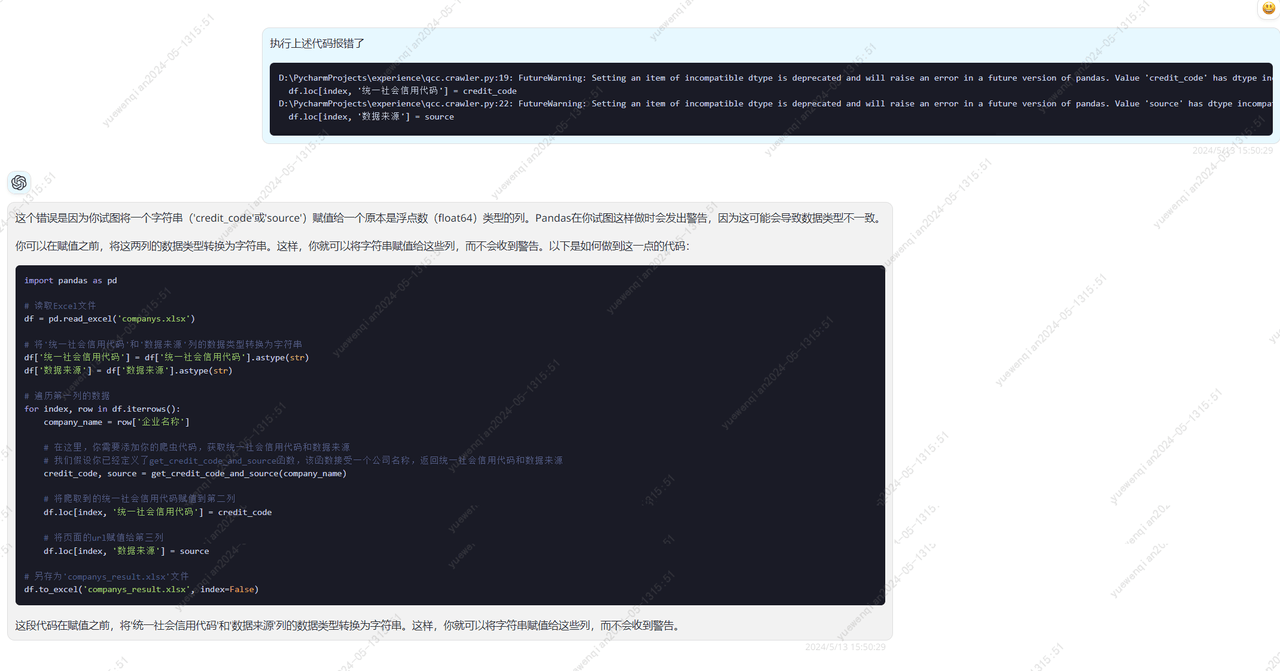
修复后的代码:
import pandas as pd

# 读取Excel文件
df = pd.read_excel('companys.xlsx')

# 将'统一社会信用代码'和'数据来源'列的数据类型转换为字符串
df['统一社会信用代码'] = df['统一社会信用代码'].astype(str)
df['数据来源'] = df['数据来源'].astype(str)

# 遍历第一列的数据
for index, row in df.iterrows():
    company_name = row['企业名称']

    # 在这里,你需要添加你的爬虫代码,获取统一社会信用代码和数据来源
    # 我们假设你已经定义了get_credit_code_and_source函数,该函数接受一个公司名称,返回统一社会信用代码和数据来源
    credit_code, source = get_credit_code_and_source(company_name)

    # 将爬取到的统一社会信用代码赋值到第二列
    df.loc[index, '统一社会信用代码'] = credit_code

    # 将页面的url赋值给第三列
    df.loc[index, '数据来源'] = source

# 另存为'companys_result.xlsx'文件
df.to_excel('companys_result.xlsx', index=False)
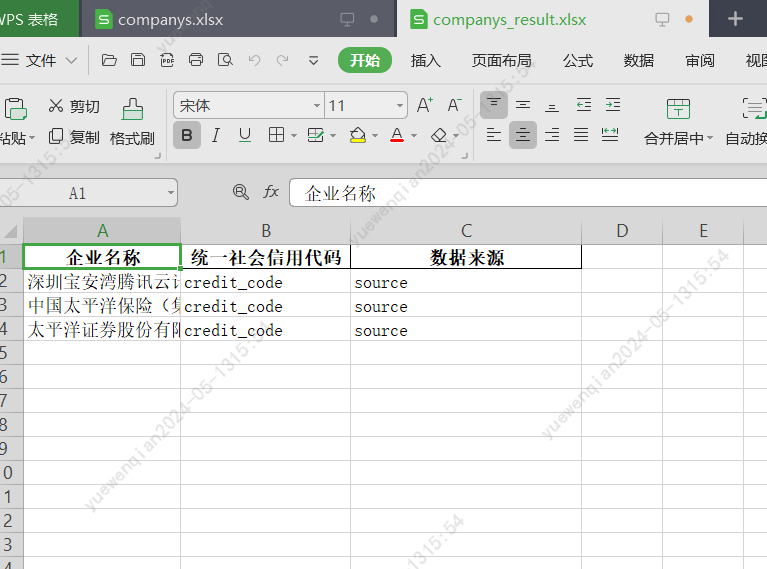
执行后,可以看到生成了'companys_result.xlsx'文件,打开查看下,没什么问题。
然后就是整合上述所有代码,读取xlsx、爬取数据、解析html、写入xlsx
让gpt4帮助我们进行代码整合
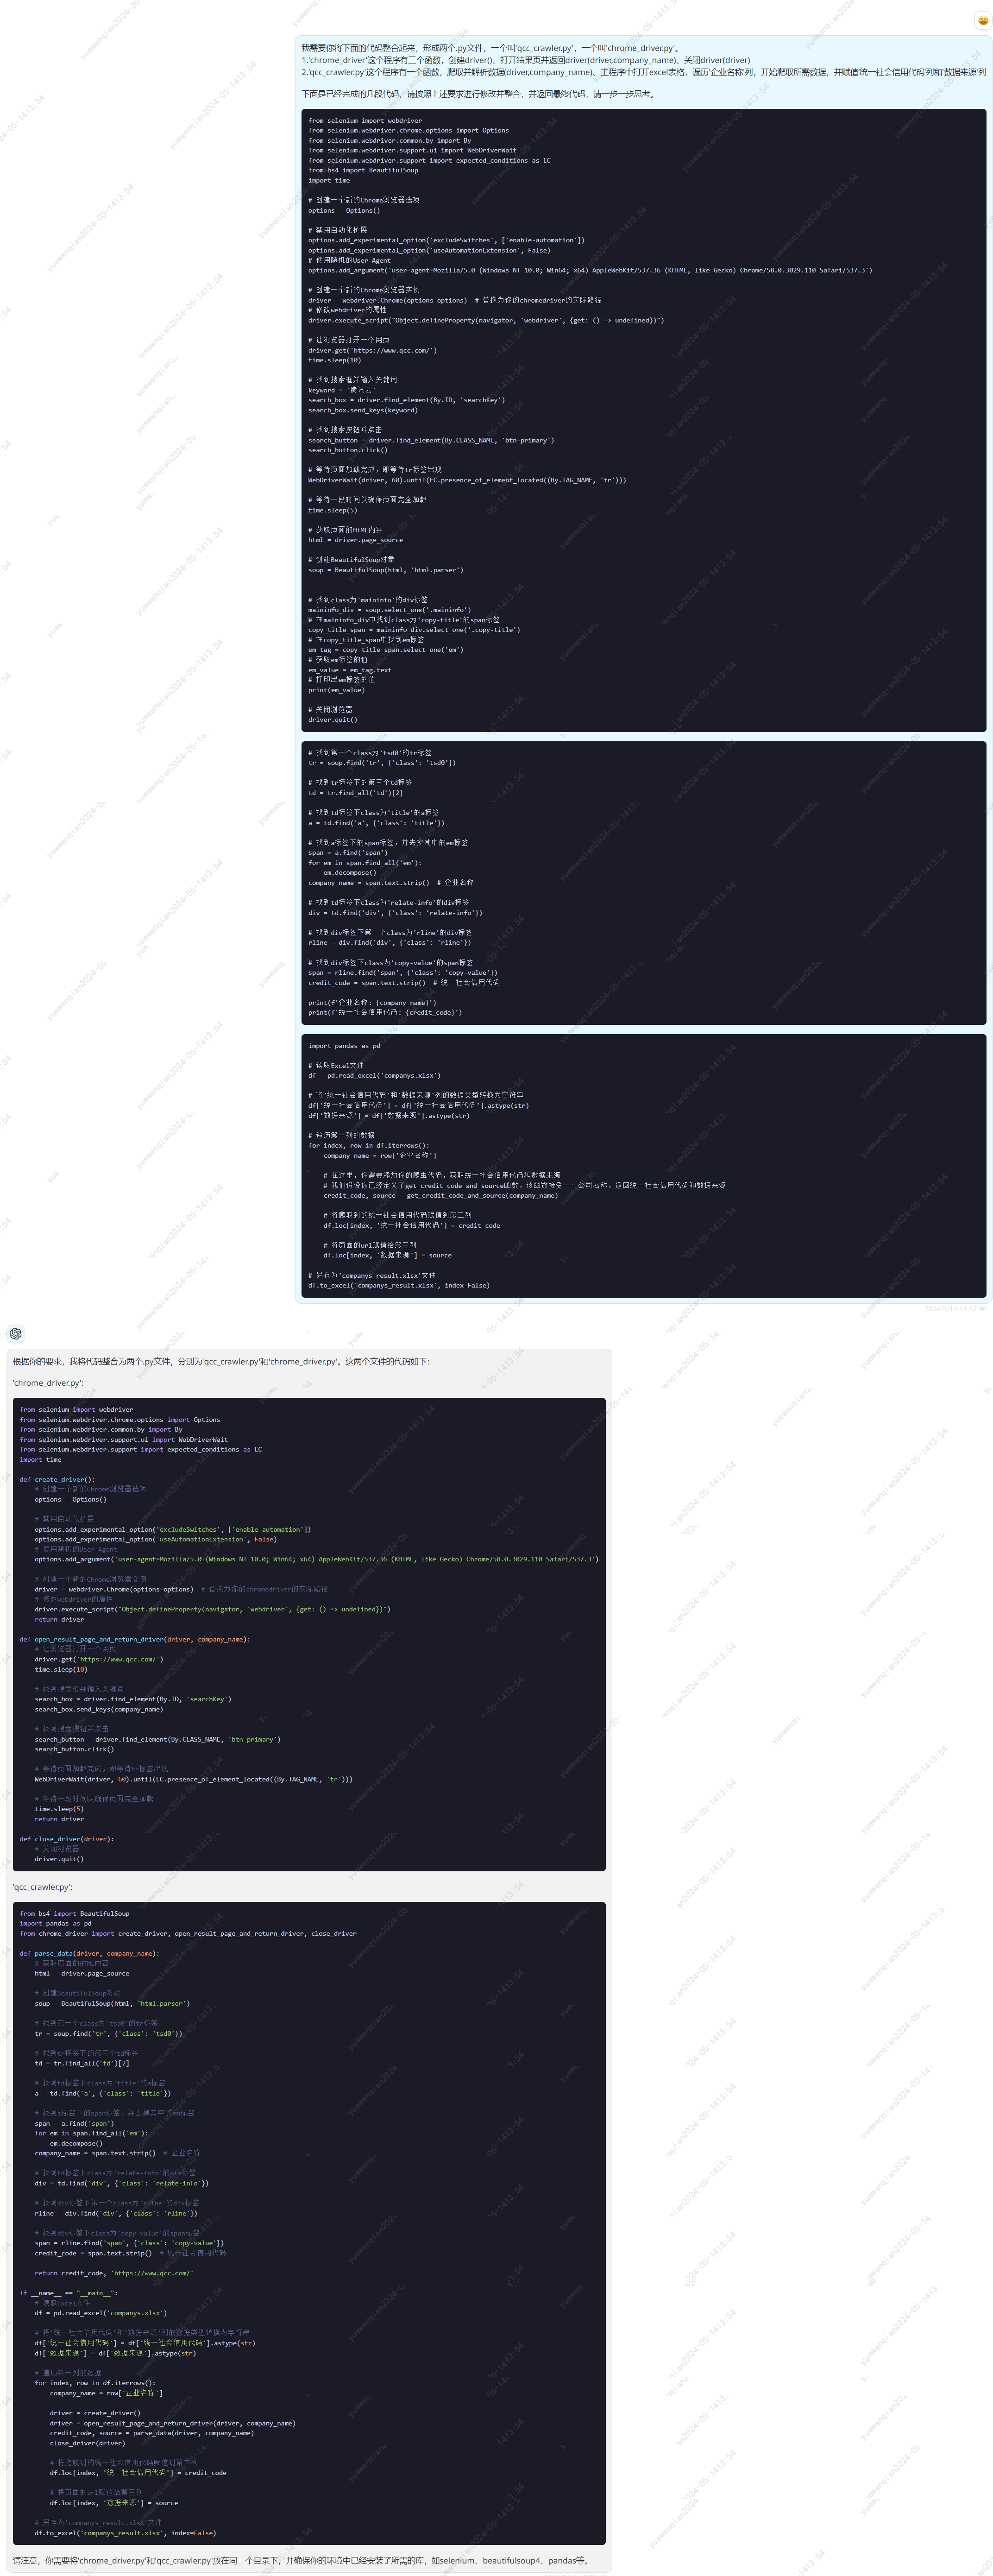
chrome_driver.py
from selenium import webdriver
from selenium.webdriver.chrome.options import Options
from selenium.webdriver.common.by import By
from selenium.webdriver.support.ui import WebDriverWait
from selenium.webdriver.support import expected_conditions as EC
import time

def create_driver():
    # 创建一个新的Chrome浏览器选项
    options = Options()

    # 禁用自动化扩展
    options.add_experimental_option('excludeSwitches', ['enable-automation'])
    options.add_experimental_option('useAutomationExtension', False)
    # 使用随机的User-Agent
    options.add_argument('user-agent=Mozilla/5.0 (Windows NT 10.0; Win64; x64) AppleWebKit/537.36 (KHTML, like Gecko) Chrome/58.0.3029.110 Safari/537.3')

    # 创建一个新的Chrome浏览器实例
    driver = webdriver.Chrome(options=options)  # 替换为你的chromedriver的实际路径
    # 修改webdriver的属性
    driver.execute_script("Object.defineProperty(navigator, 'webdriver', {get: () => undefined})")
    return driver

def open_result_page_and_return_driver(driver, company_name):
    # 让浏览器打开一个网页
    driver.get('https://www.qcc.com/')
    time.sleep(10)

    # 找到搜索框并输入关键词
    search_box = driver.find_element(By.ID, 'searchKey')
    search_box.send_keys(company_name)

    # 找到搜索按钮并点击
    search_button = driver.find_element(By.CLASS_NAME, 'btn-primary')
    search_button.click()

    # 等待页面加载完成,即等待tr标签出现
    WebDriverWait(driver, 60).until(EC.presence_of_element_located((By.TAG_NAME, 'tr')))

    # 等待一段时间以确保页面完全加载
    time.sleep(5)
    return driver

def close_driver(driver):
    # 关闭浏览器
    driver.quit()
qcc_crawler.py
from bs4 import BeautifulSoup
import pandas as pd
from chrome_driver import create_driver, open_result_page_and_return_driver, close_driver

def parse_data(driver, company_name):
    # 获取页面的HTML内容
    html = driver.page_source

    # 创建BeautifulSoup对象
    soup = BeautifulSoup(html, 'html.parser')

    # 找到第一个class为'tsd0'的tr标签
    tr = soup.find('tr', {'class': 'tsd0'})

    # 找到tr标签下的第三个td标签
    td = tr.find_all('td')[2]

    # 找到td标签下class为'title'的a标签
    a = td.find('a', {'class': 'title'})

    # 找到a标签下的span标签,并去掉其中的em标签
    span = a.find('span')
    for em in span.find_all('em'):
        em.decompose()
    company_name = span.text.strip()  # 企业名称

    # 找到td标签下class为'relate-info'的div标签
    div = td.find('div', {'class': 'relate-info'})

    # 找到div标签下第一个class为'rline'的div标签
    rline = div.find('div', {'class': 'rline'})

    # 找到div标签下class为'copy-value'的span标签
    span = rline.find('span', {'class': 'copy-value'})
    credit_code = span.text.strip()  # 统一社会信用代码

    return credit_code, 'https://www.qcc.com/'

if __name__ == "__main__":
    # 读取Excel文件
    df = pd.read_excel('companys.xlsx')

    # 将'统一社会信用代码'和'数据来源'列的数据类型转换为字符串
    df['统一社会信用代码'] = df['统一社会信用代码'].astype(str)
    df['数据来源'] = df['数据来源'].astype(str)

    # 遍历第一列的数据
    for index, row in df.iterrows():
        company_name = row['企业名称']

        driver = create_driver()
        driver = open_result_page_and_return_driver(driver, company_name)
        credit_code, source = parse_data(driver, company_name)
        close_driver(driver)

        # 将爬取到的统一社会信用代码赋值到第二列
        df.loc[index, '统一社会信用代码'] = credit_code

        # 将页面的url赋值给第三列
        df.loc[index, '数据来源'] = source

    # 另存为'companys_result.xlsx'文件
    df.to_excel('companys_result.xlsx', index=False)
代码看下来没什么问题,加了一些日志打印和休眠时间后,尝试执行代码。
结果报错了,看描述应该是点击查询按钮的时候报的错。
selenium.common.exceptions.ElementClickInterceptedException: Message: element click intercepted: Element <button type="button" class="btn btn-primary">...</button> is not clickable at point (985, 297). Other element would receive the click: <div tabindex="-1" role="dialog" aria-labelledby="myModalLabel" aria-hidden="true" data-backdrop="true" class="app-nmodal modal fade in" style="display: block;">...</div>
尝试让gpt4进行修复
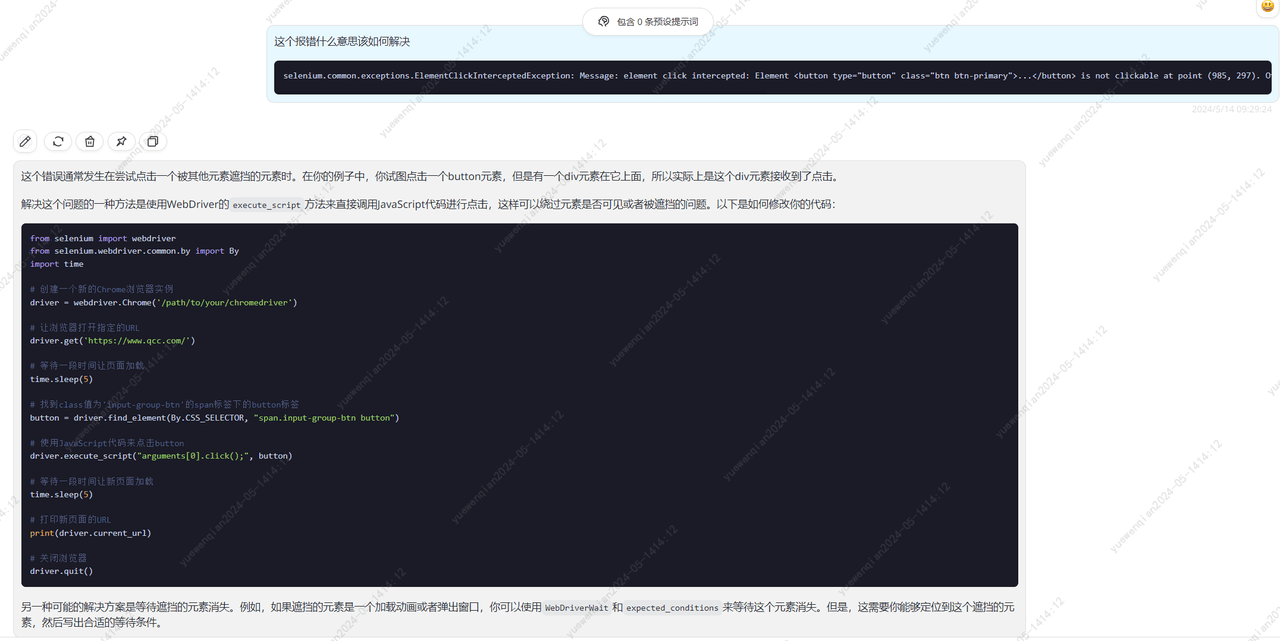
根据他的建议,我们将click()方法改为这段代码
# 使用JavaScript代码来点击button
driver.execute_script("arguments[0].click();", button)
再次执行,发现可以成功爬取数据并打印了

四、总结
简单复盘一下整个功能的完成,大模型对于我的帮助,在哪些方面提升了效率。
技术选型:对于这个功能,我虽然明确知道使用python进行实现,但是由于我对python并不熟悉,不知道哪些库可以提供对应的能力,那就需要我去搜索引擎上大量的寻找案例,尽可能去了解案例种使用的库,从而才能确定哪些库可以满足我的需求。但是让大模型进行需求分析后,只需要简单问一句,便可快速确定使用哪些库,节省了大量的时间。
对于一个完全陌生的领域,可以直接尝试从大模型获取信息,从中提取关键词,展开链式提问。这种方式相比于传统的信息搜索方式,省略了自己筛选信息的过程,所以是比较高效的。
代码生成:这个功能的大部分代码都是由大模型生成的,我仅仅是提供了实现思路,简单修改一下后,基本就可以满足需求。但是要想实现程序精细化的控制,就要求我有清晰的实现思路以及逻辑严谨的prompt,这个过程给我的感觉,已经很接近自然语言编程了。相比于高级语言编程,省略了高级语言学习的过程,提升的效率不言而喻。
针对于这个功能来说,为什么gpt4不能够直接替代我?gpt4和我仅仅差了实现思路的信息,由于gpt4没有办法直接使用工具,比如搜索引擎、浏览器抓包工具、python编译器等等,这样就无法对目标网站进行分析,就更不用谈实现思路
代码纠错:在过往的开发中,对于我来说纠错过程是这样的:查看堆栈日志->查看异常描述和定位代码位置->如果是比较熟悉的异常到这一步可能就已经有解决方案了,如果是不熟悉的异常可能就需要依靠搜索引擎搜索解决方案。但是借助大模型,我仅仅需要将抛出异常的代码和异常的描述信息丢给大模型,立刻就能得到异常的解决方案。
代码整合:在使用大模型时,为了达到更精细的控制,我往往会将功能进行拆解,然后分别让大模型实现各个小功能,在不超出上下文限制的前提下,gpt4成功地按照我的要求整合了所有代码。
如果大模型的上下文限制足以容纳整个项目的代码,那么理想情况下将轻易地完成项目重构。然而我认为实际情况会很糟糕,大模型如果想要对项目代码和业务逻辑联系起来,要么源于注释内容,要么源于变量名、或其他可以关联业务逻辑的内容。而这些数据的维护又依赖于开发人员的素养,一个项目的开发人员有很多,代码的水平和风格参差不齐。所以传统项目交给大模型重构我认为是不太理想的。